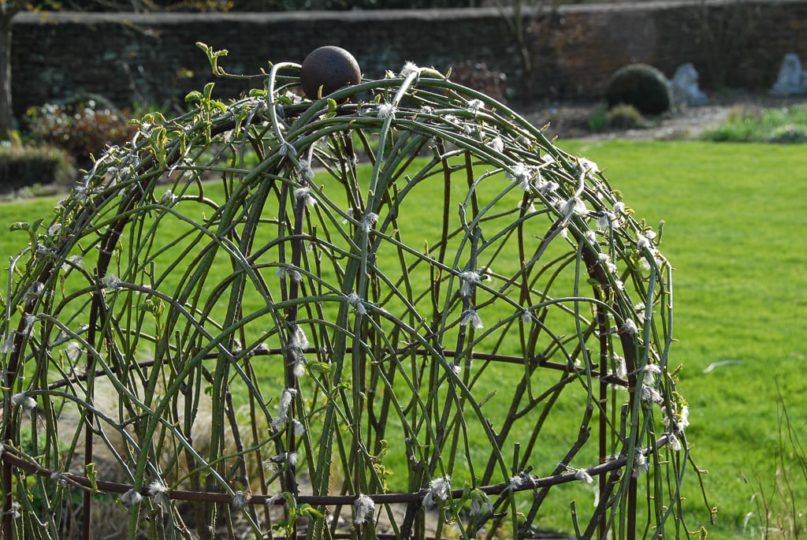
Ever since, Jenny Barnes showed me how she created her incredible sculptures at Asthall Manor, our roses have also been subjected to this intense horticultural yoga. We now prune, bend, twirl, whirl and swirl them into a patchwork of shapes. Apart from winter interest, I can certainly attest the resulting boost of blooms, and the satisfaction of seeing the blooms spread fluently across the stems rather than concentrated at the top. Busy gardeners, don’t really need yet another job, but this exercise is now very much a staple chez nous. Two years on, yours truly has not only advanced up a couple of tremulous ladder steps, but has learned a few things a long the way. Time to check in with Jenny to check on a few technique queries…
Since our first meeting Jenny has left the wonderful Asthall Manor, and now looks to the fine Cottesbrooke Hall & Gardens, as her new green office. Cottesbrooke, famous for not just for the incredible Queen Anne house (1702), but so too for the lovely gardens that boast the sweat of some of this country’s most famous designers, such as Arne Maynard and James Alexander Sinclair.
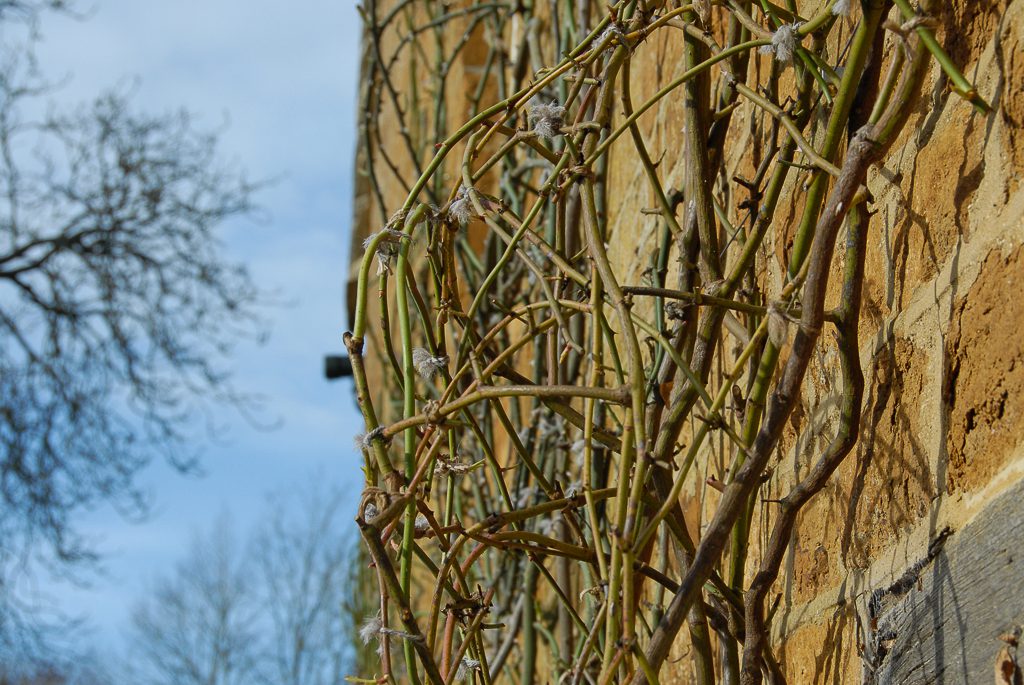
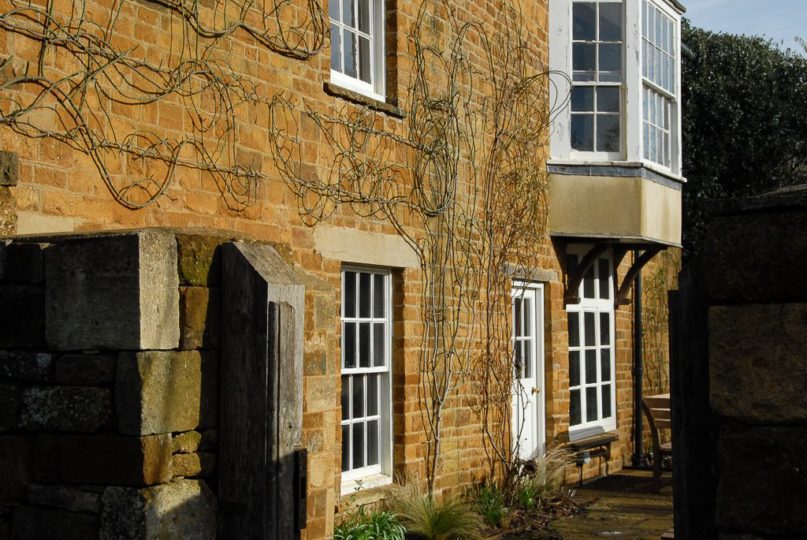
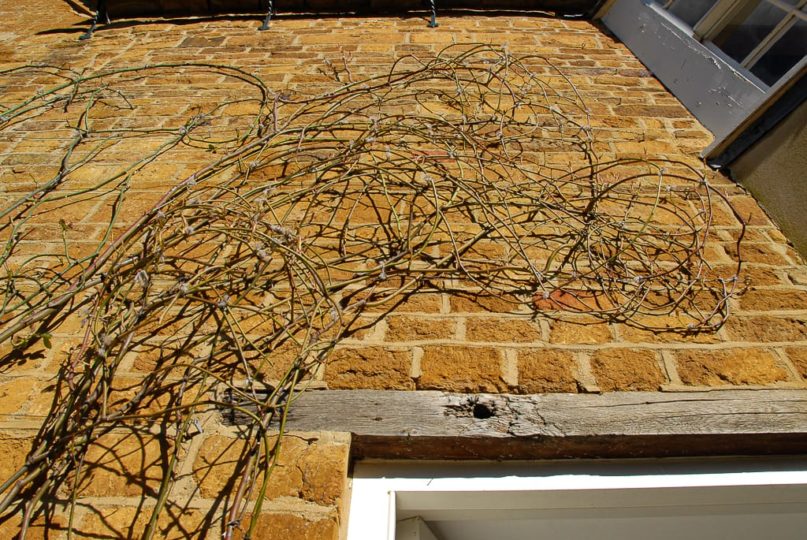
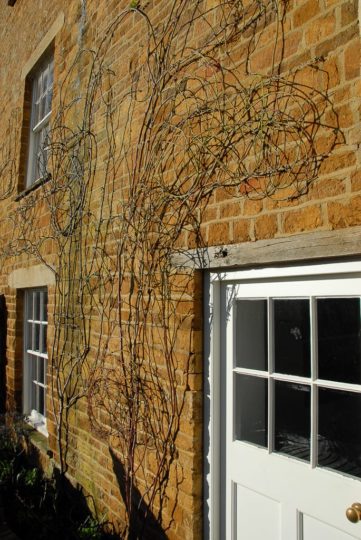
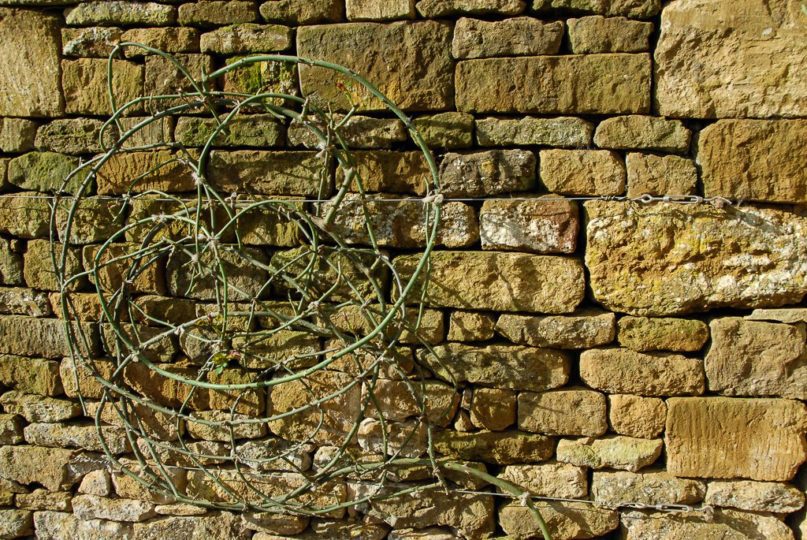
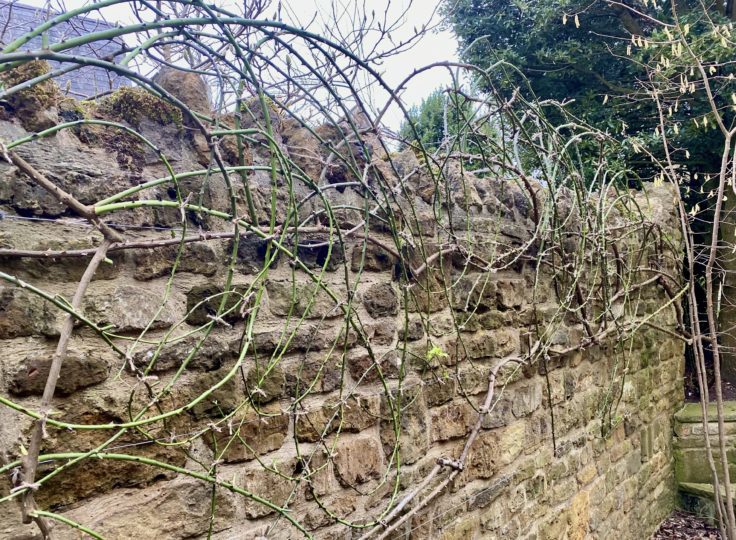
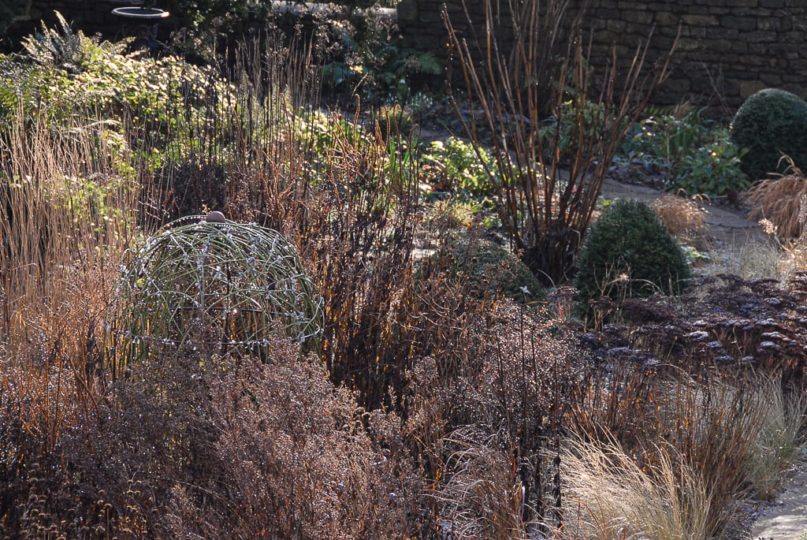
For two years now, I have religiously followed the Asthall principles of this rose pruning technique. For the full ‘how-to’, see previous blog post and video. Basically, come dormant season, I pluck the roses removing all their foliage, prune out the dead, and weave them into beautiful circular shapes. Border roses too, enjoy this service, which adds real interest in the winter border. Admittedly, the border roses were initially shaped into ‘loose’ sculptures, but are now tied in to a lovely iron structure for additional stability. You see, however tight I tied them in, once burdened with the full weight of the foliage and flowers, they were no match for the ruthless gusts of wind we endure here. Jenny, I’m sure could have won that battle, but I succumbed and sought solace in metal reinforcements. I do have penchant for a bit of rusty metal anyway…


It’s not just the blooms that come…
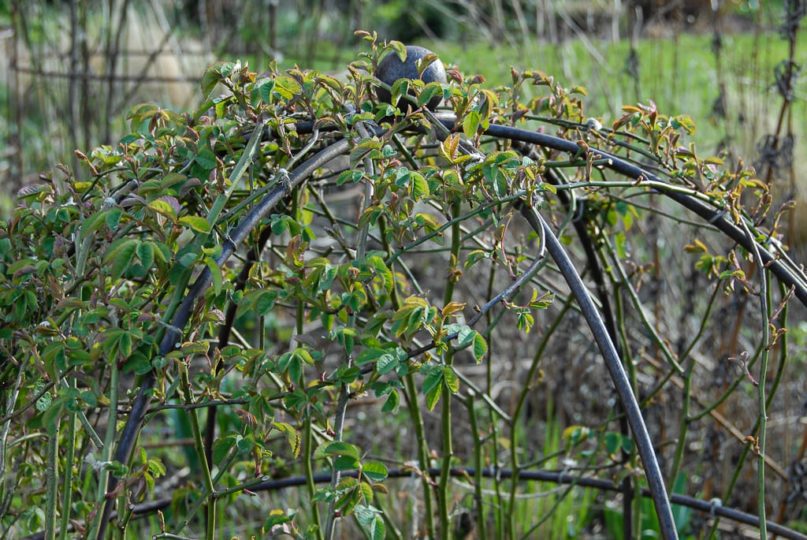
My first query, was relating to the incredible growth the roses put on after being tied in. I was under the false impression that once I braved the ladders did all my pruning and tying in, I could then smugly sit back and admire my handiwork. A nice break for a true ladder wimp, taking pride in my tremulous ladder labours until the roses come back into force in spring and summer. Ehhh, no….
You see, this technique does what it says on the tin. By ‘forcing’ the stems and branches into varied directions (horizontal, downward), you are in actual fact slowing down the movement of sap, and the result is more flowers, but so too more growth. That all sounds wonderful, but nothing really prepared me for the meterage of growth that just kept on coming through.
To prevent wind damage, I did (bravely) go back up again to tie in the new growth. Speaking to the maestro, I was flummoxed by the answer. This growth is normal, and needs to be ‘dealt with’. ‘When I was at Asthall, I would cut back all the non flowering shoots that appeared right back to the main stem and shape, until the garden opened to the public, – which at the time was middle of June’. Knowing the sheer number of enormous roses they have all over that house, my respect for this girl’s work just went up another set of notches.
To conclude therefore, get back up on that ladder and keep cutting back to the stem/shape. This is the only way to, keep the shape. When you’ve had enough, and are happy for it to go ‘woolly’, you stop. According to Jenny, you don’t need all this extra growth to work with anyway, especially from the very vigorous roses. Very true, as mine put on at least 80-90cm growth from all exposed buds. Granted, if you are just starting out, you may wish to keep this growth, but it will need to tied in. Especially so, if they are exposed to the wind as in our case.
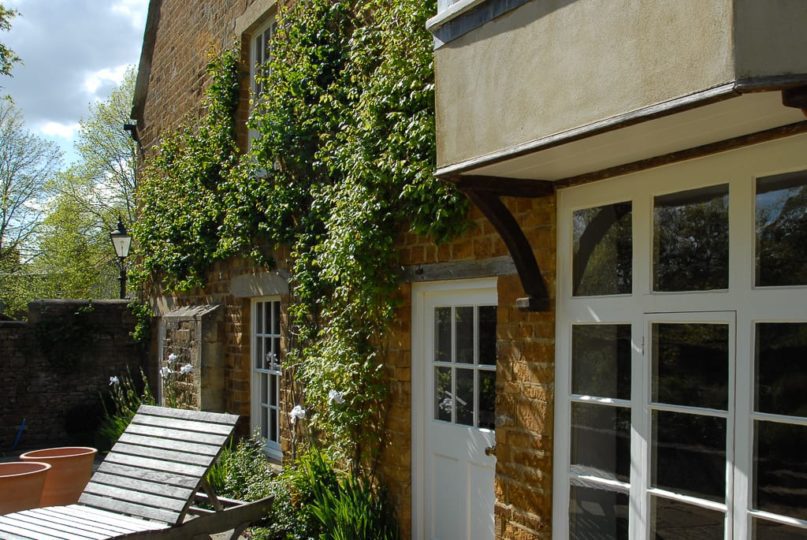
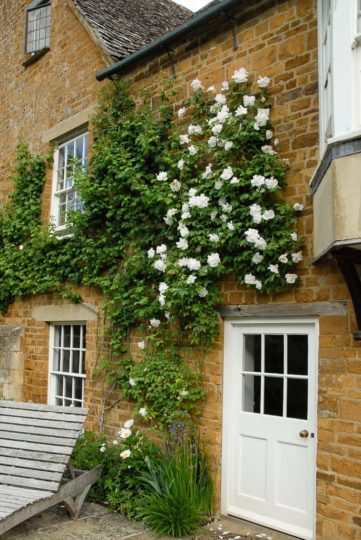
As a bonus for this – unforeseen – additional work, Jenny explained that when they flower, the roses flower beautifully ‘within the shape’, and the the flowers open up more. They’d better… back up that heinous ladder I go.
Assess your roses before you start
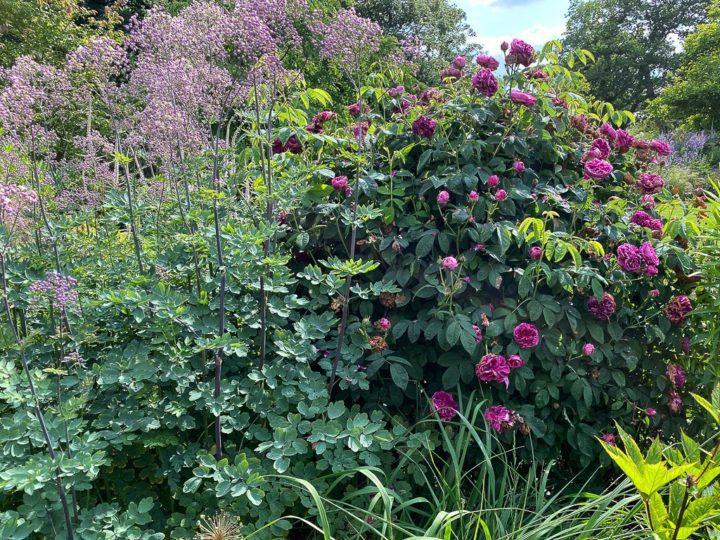
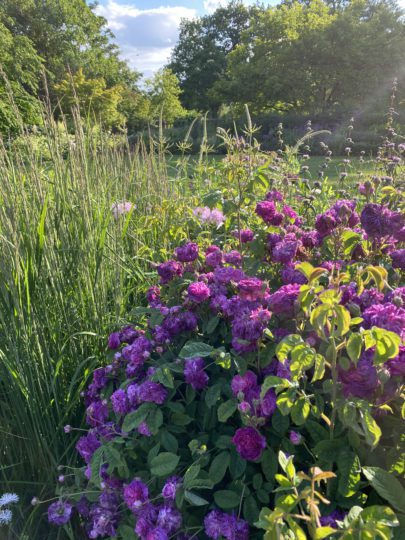
Following this technique, you are putting your roses under considerable strain. Most roses like being tightly bound and take to the technique beautifully. The revised flowering and growth rate of our Charles de Mills roses in the borders for example, seems to know no bounds. We have never had such a quantity of flowers, nor appearance of so many strong, new stems every year. Moreover, they look healthier than they have ever been.
However, one rose has hated it. Surprisingly so, as it’s a vigorous rambler; Rambling Rector. He sulked terribly and developed terrible mildew after the tying in, never previously having had this problem before. Blooms were poor too, and overall, he looked a sad sight. Granted, we did have summer droughts, which didn’t help, but this was the only rose that reacted like this. It’s not in the variety either, as I have seen Jenny tame a Rambling Rector at Asthall, so that couldn’t be the reason.
The main difference between this and all the other roses, is its rather poor location (by predecessor). Monsignor Rector competes in a narrow bed, with four established Holm Oaks. Not ideal, and and is seemingly losing. No matter, how much feed/compost/mulch, he continues to struggle and with the added strain of the Asthall technique, he just couldn’t cope. Gleefully, I can report that Jenny has experienced this problem too. ‘We had two Dorothy Perkins roses on opposite walls at Asthall. One was absolutely fine and beautiful. The other, got mildew every year, despite everything I would do.’
Alas, there is no magic solution here. Jenny simply removed the mildewed Dorothy Perkins at Asthall, and replanted with another type of climber. Cutting out the mildew is a possible method of control, but I worry that we too that we may need to start again. Not quite willing to give up yet, I have simplified the structure. Cut out much more than I would have liked, and reduced it’s spread considerably in an attempt to ‘lighten the load’. I shall mulch again, and try to keep on top of watering to try to prevent the onslaught of mildew, but we shall see if it helps. So far so good, but we shall see.
The lesson here though, is asses your roses before you start this technique. If it’s healthy, it should respond well. If sickly, you may just be exacerbating the problem(s).
A touch of rouge….
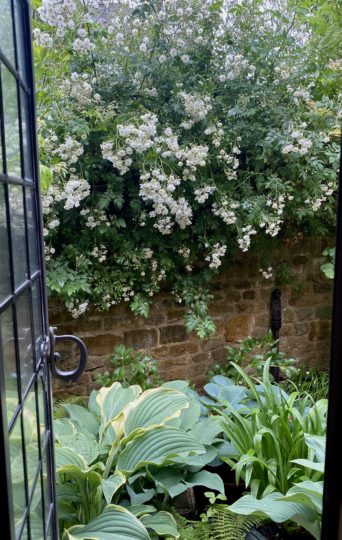
Part of this technique involves the plucking of all their foliage to expose their stems. Never once really looked at them closely, it turns out that rose stems are beautiful and overlooked for their aesthetic value. Granted, roses will probably never snatch the ‘Miss Best Bark’ trophy from trees, but they’re beautiful none the less and fully deserve a place in the line up. Long John Silver for example has lovely brushed, silvery stems, and Madame Alfred, boasts fabulously vibrant red stems. The red stems in particular are a real bonus as they give your rose shapes, depth of colour and true vibrancy.
If you fancy a bit of rouge in your rose sculptures, plant; Madam Alfred de Carriere, Cecile Brunner and Rose ‘Adélaïde d’Orléans’. All tried and tested for this technique, and respond very well to it. Madame Alfred in particular as she’s not only (pretty much) thornless, but also superbly bendy.
Dedicated pruning times
We have three different varieties of roses growing on our walls. Madame Alfred Carrière, Long John Silver and a recent addition, Veilchenblau. They have all taken to this pruning technique, but as their growth rates are so varied, I wanted to know if Jenny, times her pruning schedules to respective rose varieties/groups. I had of course forgotten, that her quota of roses is in the hundreds. A wee way off, my somewhat lowly eleven or twelve….
The answer was hence unsurprisingly, no. ‘At Asthall I started on one end and just worked my way around until I got around. It’s really just about getting it done’, she said. The good news though, is it means that all roses, be they ramblers or climbers (normally pruned at different times), respond well this ‘blanket’ winter pruning approach.
What I would say, is get to know your roses. Long John Silver, as is in the name, puts on incredibly long growth in a relatively short time. I have learned that I have a very small window of opportunity to bend those stems into shape, otherwise they quickly become thick and brittle. Once thickened, they really aren’t ‘useable’, as they lose their flexibility leaving no other option but pruning. Madame Alfred on the other hand, is far bendier, and her stems remain bendy throughout the season so you have more flexibility as to timing. Monsignor Rector too, remains more flexible, but the new growth will stiffen up as it ‘ages’. Be it, slower than Long John Silver.
Though, as Jenny reminds me, don’t panic. ‘If a stem snaps, it’s not a problem. It’s a rose, it’ll grow another’. Quite.
Patience is the main ingredient
Two years on and slowly slowly, the (3D) shapes are starting to appear. Every year, they build up (and down as you need prune out any dead), but it does takes time.
Compared to Jenny’s my rose shapes still look quite ‘naked’, and have a way to go before I too can boast those rich tapestries of stems you see appearing on her instagram feed. For reference, our roses have been in for 4 years (planted from bare root), and I’ve applied this technique for two.
The secret is in the volume of material you have to hand. The more you have, the better, and the ‘richer’ your shape will look. That kind of volume comes with time. Mature roses have a better ‘engine’, and will produce more stems for you, than younger ones.
If you’re new to this technique and you have an old rose to work with, you’ll find it can reap it’s rewards relatively quickly. Newly planted roses, take their time. Interestingly, even maestro’s sometimes need to start afresh. At Asthall, Jenny was working with established, very mature roses. This winter, they have planted 60 new roses at Cottesbrooke and will hence be the first time she’s working with new ‘young’ roses. Though, keen for quick-ish impact, she’s developed an interesting planting technique. ‘I have planted 3 or 4 together to ensure it, become a massive thing. About a meter apart, to give you that instant growth to work with, and I will then tie one to the other. And you can always take one out if they get too big’, she explained.
Get the proper kit
As is the case for any gardening job, it’s easier if you have the right kit. Especially so if you need to scale walls…
Ladders
Unlike me, Jenny loves a ladder and will happily work with what ever is available. There is no doubt, you will need a good quality ladder to do this job. The roses on our walls have grown right up to the altitudinous levels of the second floor, which for me is like climbing Everest. You’ll need to be able to do this, safely and sadly as I have now learned, often. In addition, you need some space off the wall, to freely work with the stems, so ladder spacers may help you.
The ladder wimp that I am, I do prefer a tripod ladder as it gives you that extra stability, though they are not without problems of their own. The large ones are cumbersome to move (on your own) and often difficult to get right up close to the house walls as borders, gullies, gutters etc., tend to always be ‘in the way’. Adjustable legs can help this problem, but only to some degree. We have worked with both Niwaki tripod ladders, as well as Henchman’s, both of which I would recommend. Invest in the best you can get, and look after it. Incidentally, look at the treads too. You’re up there a long time, and it can be quite sore standing on thin treads for a long time.
Good wellies/boots will help. Jenny and I both (independently) opted for the fabulous ‘Anti-fatigue’ wellies from Aigle as they have a thicker, more supportive sole. Hunter Gardener wellies too, with their central dig pad provide some support on ladder treads, but find they are not as supportive – in general, as my Aigle’s.
Gloves
Forget it. They don’t work. Just like Jenny, I have tried every kind, but however thin, smart, super duper they may be, you just can’t tie the (small) knots (tightly) with gloves on. At least I can’t, and nor can the maestro. A bright spark (and forgive me as I can’t credit this genius as I forgot whom it was on facebook), cut the two index fingers off her gloves, leaving her free to tie knots and is hence, still protected from the heinous thorns. I’ve not had much success, with this fingerless glove technique, but that may just be down to personal preference. Definitely, the closest to a glove solution I have ever come across. Incidentally, a good way to extend the life cycle of garden gloves. After all, it’s always in the darned finger tips where they demise first.
There is no denying it, without gloves, this is a bloody job and your hands will be sore for days after. The pain is alleviated quicker if you clean/scrub your hands properly and disinfecting, the wounds properly. I’ve found a wash in a watered down solution of ye oldie borax works well. Just have a look in your grandmother’s kitchen cabinets…
Garden twine
Not all twine is good twine. Jenny has no preference, nor I particularly but it must be good quality. You put the twine under immense strain and it must hold, and do so until you next undertake the big prune in a year’s time.
Similarly, as you’re up on that ladder, balancing precariously in the wind (I’m over-egging this I know), you want to be quick and efficient. Ties must hold, so that you avoid rose stems swinging and pinging you in the face. Not pleasant, I assure you and if you’re up high, dangerous too.
Nutscene are an obvious target, as they produce good quality twine but Jenny has also happily used the ‘bog standard stuff’ from her local BHGS. Having experimented with several, including rather fancy charred jute (don’t bother), jute twine is by far the best. As much as I love it, Twool is unfortunately not suited to this particular job. Twool is great, but it’s ‘slippy’ and hence needs at least three knots to secure. Furthermore, as as soon as it rains, ties becomes fluffy and woolly, and unfortunately thereby quite ‘visible’ on your structures.
I’m not a fan of any form of plastic tie, so not keen on flexi-tie or similar, at all. I prefer a biodegradable product, and ideally one of known/local origin. I don’t bother with the colours, natural is best. Green twine is never quite the right green to look natural, and they always fade to the natural anyway.
Jenny has clever way of avoiding wastage, worth mentioning. She puts the spool in one pocket, then pulls the twine out, over and around her neck, and then down to her (other) side, so that she can tie with it still on the roll. ‘I never cut bits. This way, I cut as I go. Also means you can drop it as it’s not going anywhere’. Though, amusingly the only problem is that on the off-occasion that she drops her secateurs, ‘you’re tied to the rose, high up on a ladder!!’.
Secateurs
Again, personal preference is key here as you want to do the work efficiently and effectively. Most importantly they must be sharp. You want quick, clean cuts. In addition, you ideally want them sharp enough to cut the twine as well as to prune. Being high up on a ladder, you must avoid the need for juggling with scissors, secateurs, twine so you want to limit your arsenal of tools.
I’m a big Niwaki fan and treasure my Pro Secateurs, as well as Okatsune. Jenny on the other hand, ‘can’t get on with the Niwaki catch’, so prefers her ‘bog standard Felco number 2’s’. As you can with Felco’s, she renews the blade every autumn, before pruning so they’re always sharp.
Happy pruning and please take care on those ladders….!